Category Archives: How To

How to get the Broadcom wireless drivers working in Chromium OS

Update 16/12/13. Please Note: You need to use the special edition builds noted http://arnoldthebat.co.uk/wordpress/2013/12/16/broadcom-special-edition-build/ to use Broadcom drivers

==============================================================================

A shameless cobbling of the build files from http://linux.dell.com/files/cto/ leads to a fix for the Broadcom wireless issues!

As ever, boot your device and get to su command line  ([ Ctrl ] [ Alt ] [ F2 ]), log in as chronos and then:

sudo su
mount -o remount, rw /
sudo echo "blacklist b43" >> /etc/modprobe.d/blacklist.conf
sudo echo "blacklist b43legacy" >> /etc/modprobe.d/blacklist.conf
sudo echo "blacklist ssb" >> /etc/modprobe.d/blacklist.conf
sudo echo "blacklist bcma" >> /etc/modprobe.d/blacklist.conf
sudo echo "wl" >> /etc/modules
sudo touch /etc/modprobe.d/wl.conf
sudo echo "alias wlan0 wl" >> /etc/modprobe.d/wl.conf
cd /lib/modules/3.4.0/kernel/drivers/net/wireless/
wget http://chromium.arnoldthebat.co.uk/files/fw/lib/modules/3.4.0/kernel/drivers/net/wireless/wl.ko
sudo insmod /lib/modules/3.4.0/kernel/net/wireless/cfg80211.ko
sudo insmod /lib/modules/3.4.0/kernel/net/wireless/lib80211.ko
sudo insmod /lib/modules/3.4.0/kernel/net/wireless/lib80211_crypt_ccmp.ko
sudo insmod /lib/modules/3.4.0/kernel/net/wireless/lib80211_crypt_tkip.ko
sudo insmod /lib/modules/3.4.0/kernel/net/wireless/lib80211_crypt_wep.ko
sudo insmod /lib/modules/3.4.0/kernel/drivers/net/wireless/wl.ko
sudo depmod -a

Wireless networks should start to miraculously appear and you can connect as required.

One minor gripe is that the driver doesn’t seem to like hidden SSID and bombs out when attaching to them. Other that that it seems to work fine!

Huge thanks to Doug Anson @ Dell for providing the driver.

As per the readme located http://www.broadcom.com/docs/linux_sta/README.txt a good few variants should be supported. As ever, its tested on a Dell Inspiron 910 only (Mini 9)!

How to get the touch pad working in Chromium OS

If you are one of the few with a none working touch pad, hopefully the below will sort it!

As ever, boot your device and get to su command line  ([ Ctrl ] [ Alt ] [ F2 ]), log in as chronos and then

sudo su
mount -o remount, rw /
cp /etc/X11/xorg.conf.d/50-touchpad-cmt.conf /etc/X11/xorg.conf.d/50-touchpad-cmt.conf.bak
rm /etc/X11/xorg.conf.d/50-touchpad-cmt.conf
cd /etc/X11/xorg.conf.d/
wget http://chromium.arnoldthebat.co.uk/files/fw/etc/X11/xorg.conf.d/50-touchpad-cmt.conf

Then reboot.

The contents of the conf file have been ripped from a Dell Latitude setup so may well not sort other laptops. In this case I would suggest that the file is structured in the following manner:

Section "InputClass"
 Identifier "touchpad"
 MatchIsTouchpad "on"
 MatchDevicePath "/dev/input/event*"
 Driver "synaptics"
 Option "AccelerationProfile" "-1"
 Option "Scroll Buttons" "0"
 Option "Scroll Axes" "1"
 Option "Scroll X Out Scale" "1.25"
 Option "Scroll Y Out Scale" "1.25"
EndSection

The important section is the “Driver “synaptics”” since the devs at Chromium have left the old synaptics stack loaded into the distribution. With this in mind, expect the above to stop working as later versions come out!

Occasionally in certain screens (like login(!)), once the screen is loaded, the mouse pointer will not appear. In order to activate simply left click anywhere on the screen.

Any dev server updates will more than likely undo any of the above so please bear that in mind.

Usual caveats around none of this ever working etc.

Getting Edimax EW-7811UN (or rtl8192cufw devices) to work with Chromium OS

Surprisingly easy as it happens!

Firstly boot your device and get to su command line  ([ Ctrl ] [ Alt ] [ F2 ]), log in as chronos and then

sudo su

Then pop in the wireless dongle and review the contents of dmesg.

You should see something along the lines of the following:

rtl8192cu: Loading firmware rtlwifi/rtl8192cufw.bin
rtlwifi: Firmware rtlwifi/rtl8192cufw.bin not available

In order to remedy this, firstly mount the OS read/write:

mount -o remount, rw /

Then create the directory structure and cd into it, and download the bin file

mkdir /lib/firmware/rtlwifi
cd /lib/firmware/rtlwifi/
wget http://chromium.arnoldthebat.co.uk/files/fw/lib/firmware/rtlwifi/rtl8192cufw.bin

Remove the dongle and reinsert. Lights on the dongle will now illuminate and you ‘should’ be able to connect to a wireless network! The version I tested against would not scan the network so I needed to add the wireless network manually. Reboot will remember the change so all should be good from that point on.

Any dev server updates will more than likely undo any of the above so please bear that in mind.

Usual caveats around none of this ever working etc.

Dev Server Updates now available!

Fed up with constantly installing new Chromium OS version from USB?

Look no further, I now present to you – “The Dev Update Server”

Resplendant with the finest daily compilations, its ready for you to upgrade your installed ChromiumOS to the latest and greatest x86-generic version.

Check the status of the Dev Server on twitter @chromium_bot since the server needs to go offline to build the latest version at around 05:00 GMT daily. Once compiled and presented, the status will say its available.

In order to update go to command line on your deployed Chromium ([ Ctrl ] [ Alt ] [ F2 ]) and log in as chronos with the password of ‘password’ (or whatever your distribution is set to). You can also use SSH.

Then sudo to su

sudo su

Once in the admin shell, update the client with the following:

For amd64  builds
update_engine_client --update --omaha_url=http://chromebld.arnoldthebat.co.uk:8081/update
For x86  builds
update_engine_client --update --omaha_url=http://chromebld.arnoldthebat.co.uk:8080/update
For amd64 special builds
update_engine_client --update --omaha_url=http://chromebld.arnoldthebat.co.uk:9080/update
For x86 special builds
update_engine_client --update --omaha_url=http://chromebld.arnoldthebat.co.uk:9090/update

This will take a while dependant on a couple of things:

  • Whether the image is compiled yet (the dev server creates a sync image on 1st use which can cause timeouts)
  • What other load the server is under.
  • Your bandwidth (some of the updates can be large).

Simply try the update command again if you get an update error or timeout similar to the below:

LAST_CHECKED_TIME=0
PROGRESS=0.000000
CURRENT_OP=UPDATE_STATUS_REPORTING_ERROR_EVENT
NEW_VERSION=0.0.0.0
NEW_SIZE=0
LAST_CHECKED_TIME=0
PROGRESS=0.000000
CURRENT_OP=UPDATE_STATUS_IDLE
NEW_VERSION=0.0.0.0
NEW_SIZE=0
[1228/134834:ERROR:update_engine_client.cc(237)] Update failed.

Once its running you should see notifications from the server saying all is fine and progressing:

LAST_CHECKED_TIME=0
PROGRESS=0.000000
CURRENT_OP=UPDATE_STATUS_CHECKING_FOR_UPDATE
NEW_VERSION=0.0.0.0
NEW_SIZE=0
LAST_CHECKED_TIME=1356707131
PROGRESS=0.000000
CURRENT_OP=UPDATE_STATUS_UPDATE_AVAILABLE
NEW_VERSION=0.0.0.0
NEW_SIZE=237376171
LAST_CHECKED_TIME=1356707131
PROGRESS=0.000000

Finally, the download will begin:

LAST_CHECKED_TIME=1356707131
PROGRESS=0.000012
CURRENT_OP=UPDATE_STATUS_DOWNLOADING
NEW_VERSION=0.0.0.0
NEW_SIZE=237376171
LAST_CHECKED_TIME=1356707131
PROGRESS=0.000012
CURRENT_OP=UPDATE_STATUS_DOWNLOADING
NEW_VERSION=0.0.0.0
NEW_SIZE=237376171
LAST_CHECKED_TIME=1356707131
PROGRESS=0.002867

If all goes well, the updates will download and the install will progress to finalising:

CURRENT_OP=UPDATE_STATUS_FINALIZING
NEW_VERSION=0.0.0.0
NEW_SIZE=237376171
LAST_CHECKED_TIME=1356708887

This can tale a while (go for a beer whilst waiting) but ‘should’ result in:

CURRENT_OP=UPDATE_STATUS_UPDATED_NEED_REBOOT
NEW_VERSION=0.0.0.0
NEW_SIZE=237376171
[1228/154101:INFO:update_engine_client.cc(241)] Update succeeded -- reboot needed.

You should now also be able to update your stateful partition (where dev tools sit) using:

sudo stateful_update

Which in turn should output:

Downloading stateful payload from http://vps2.arnoldthebat.co.uk:8080/static/stateful.tgz
 HTTP/1.1 200 OK
 Date: Fri, 28 Dec 2012 15:42:43 GMT
 Last-Modified: Fri, 28 Dec 2012 15:07:27 GMT
 Content-Length: 42236449
 Content-Type: application/x-gtar
 Server: CherryPy/3.1.2
 Connection: Keep-Alive
Successfully downloaded update
Performing standard stateful update.

You ‘should’ be able to use the process above to update Hexxxeh and others vanilla builds as well but this is (as ever) completely untested.

Subsequent updates for the OS and stateful partition will now automagically point to the new dev server (you can change using the –omaha-url noted above) so all you need to do is:

update_engine_client --update

and

sudo stateful_update

Finally, in all cases, reboot your client!

Usual Caveats, E&OE stand. The Update Server could work fantastically and make you more attractive to other humans/species from other worlds as well as updating your base build perfectly. It could also create a black hole of NGC 4889 proportions and end the world as we know it as well as bricking your install completely. You have been warned!

Further details and notes available http://goo.gl/OBG2Y

Getting Logstash to run as a daemon

Currently evaluating Logstash and its centralised log management facilities. So far its looking like a good candidate for replacement of far more expensive utilities and seems very nippy when searching. The search query syntax is well documented so its very easy to use once set up.

As ever, using the nice and simple approach to get it working in the first instance as a standalone server. Then needing to keep the engine running for long term testing, its obviously better to run as a daemon. This was a bit of a cludge so noted for ref.

Cribbing https://gist.github.com/1121786 and creating the following:

sudo vi /etc/init.d/logstash

Copy the contents of the github link. A few small changes are required:

DAEMON=/usr/bin/java #obviously!
ulimit -n 32000 #allows elastic search to hold more than the default 1000 files open
ARGS="-Xmx$JAVAMEM -Xms$JAVAMEM -jar /opt/logstash/logstash-monolithic.jar agent --config ${CONFIG_DIR} --log ${LOGFILE} --grok-patterns-path ${PATTERNSPATH} -- web --backend elasticsearch:///?local"

This last sections tells the engine to start a web server (port 9292 default) and also use the local server as the elasticsearch provider. Everything is therefore running on one server in this instance which also maintains syslog for all other devices on the network.

Create the new user to run as:

sudo adduser --system --disabled-password --no-create-home --group --quiet logstash

Allow the user to read syslog files (probably a far better way to do this but I am not concerned about security at the moment)

sudo usermod -a -G adm logstash

Create all the directories mentioned on the script:

mkdir /opt/logstash/
mkdir /etc/logstash.d/
mkdir /var/log/logstash/
mkdir /opt/logstash/patterns/

CHOWN the directories as per the following example:

sudo chown -R logstash:logstash /etc/logstash.d/
sudo chown -R logstash:logstash /var/log/logstash/
sudo chown -R logstash:logstash /opt/logstash/

Download the jar file and rename:

sudo wget http://semicomplete.com/files/logstash/logstash-1.1.0-monolithic.jar
sudo mv logstash-1.1.0-monolithic.jar logstash-monolithic.jar

Add the config below to /etc/logstash.d/mylogstash.conf

input {
 file {
 type => "linux-syslog"
# Wildcards work, here
 path => [ "/var/log/*.log", "/var/log/messages", "/var/log/syslog" ]
 }
# file {
# type => "apache-access"
# path => "/var/log/apache2/access.log"
# }
# file {
# type => "apache-error"
# path => "/var/log/apache2/error.log"
# }
}
output {
 # Emit events to stdout for easy debugging of what is going through
 # logstash.
 stdout { }
# This will use elasticsearch to store your logs.
 # The 'embedded' option will cause logstash to run the elasticsearch
 # server in the same process, so you don't have to worry about
 # how to download, configure, or run elasticsearch!
 elasticsearch { embedded => true }
}

As you can see, all we look to do in the first instance is syslog search only. I have removed the apache logging for the moment (basically since its not installed on my test server!)

Make the logstash script executable and start the engine

sudo chmod +x /etc/init.d/logstash
sudo /etc/init.d/logstash start

If all is good, you can

 tail -f /var/log/logstash/logstash.log

And hopefully see the engine start and the fact its logging syslog content as it arrives at the server.

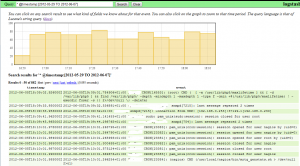
Then, give it a few minutes, open your browser, then hopefully you will have a log crawler and searcher! Ill be leaving this running for a few weeks to see how it scales so will report back on performance and any additional tweaks required.